目次
SberSwapとは
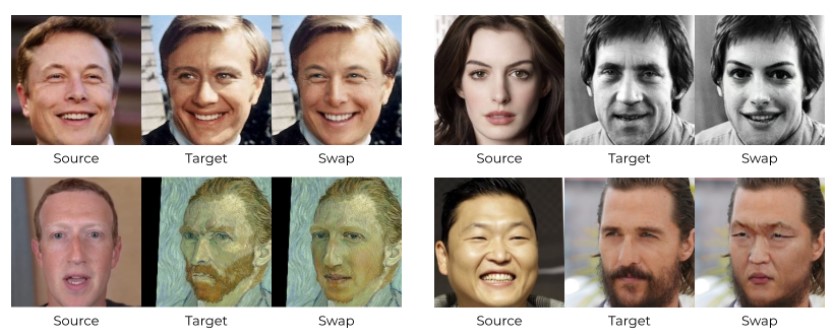
SberSwapは顔交換(FaceSwap)を実現するための手法の1つで、ディープラーニングを応用しており、精度良い結果が得られます。従来のDeepfake等のFaceSwapの手法では個別の学習に時間がかかるという課題がありましたが、SberSwapではその学習が必要なく、とても簡単にFaceSwapの結果が得られます!
SberSwapの使い方
SberSwapはGithubで公開されています。
GithubのREADME.mdにインストール方法や自分でモデルを学習する方法が書いてありますが、その中に、すぐに試せるGoogle Colabのデモもあるので、そちらでSberSwapを試してみましょう!
SberSwap Google Colabの内容について
ブロック毎の処理内容について解説します。
① 最初のブロックではGPUとCUDAのバージョンをチェックしています。
#@markdown #**Check GPU and CUDA version**
!nvidia-smi
!nvcc --version</code></pre>
② githubからコードをcloneして学習済みのモデルをダウンロードします。
#@markdown #**Clone github & download models**

!git clone https://github.com/sberbank-ai/sber-swap.git
%cd sber-swap

# load arcface
!wget -P ./arcface_model https://github.com/sberbank-ai/sber-swap/releases/download/arcface/backbone.pth
!wget -P ./arcface_model https://github.com/sberbank-ai/sber-swap/releases/download/arcface/iresnet.py

# load landmarks detector
!wget -P ./insightface_func/models/antelope https://github.com/sberbank-ai/sber-swap/releases/download/antelope/glintr100.onnx
!wget -P ./insightface_func/models/antelope https://github.com/sberbank-ai/sber-swap/releases/download/antelope/scrfd_10g_bnkps.onnx

# load model itself
!wget -P ./weights https://github.com/sberbank-ai/sber-swap/releases/download/sber-swap-v2.0/G_unet_2blocks.pth

# load super res model
!wget -P ./weights https://github.com/sberbank-ai/sber-swap/releases/download/super-res/10_net_G.pth
③ 必要なライブラリをインストールします。
#@markdown #**Install required libraries**

!pip install mxnet-cu101mkl
!pip install onnxruntime-gpu==1.8
!pip install insightface==0.2.1
!pip install kornia==0.5.4
④ 利用するライブラリをロードしています。
#@markdown #**Preparation**

import cv2
import torch
import time
import os

from utils.inference.image_processing import crop_face, get_final_image, show_images
from utils.inference.video_processing import read_video, get_target, get_final_video, add_audio_from_another_video, face_enhancement
from utils.inference.core import model_inference

from network.AEI_Net import AEI_Net
from coordinate_reg.image_infer import Handler
from insightface_func.face_detect_crop_multi import Face_detect_crop
from arcface_model.iresnet import iresnet100
from models.pix2pix_model import Pix2PixModel
from models.config_sr import TestOptions
⑤ モデルの初期化を行います。
#@markdown #**Initialize models**

app = Face_detect_crop(name='antelope', root='./insightface_func/models')
app.prepare(ctx_id= 0, det_thresh=0.6, det_size=(640,640))

# main model for generation
G = AEI_Net(backbone='unet', num_blocks=2, c_id=512)
G.eval()
G.load_state_dict(torch.load('weights/G_unet_2blocks.pth', map_location=torch.device('cpu')))
G = G.cuda()
G = G.half()

# arcface model to get face embedding
netArc = iresnet100(fp16=False)
netArc.load_state_dict(torch.load('arcface_model/backbone.pth'))
netArc=netArc.cuda()
netArc.eval()

# model to get face landmarks
handler = Handler('./coordinate_reg/model/2d106det', 0, ctx_id=0, det_size=640)

# model to make superres of face, set use_sr=True if you want to use super resolution or use_sr=False if you don't
use_sr = True
if use_sr:
    os.environ['CUDA_VISIBLE_DEVICES'] = '0'
    torch.backends.cudnn.benchmark = True
    opt = TestOptions()
    #opt.which_epoch ='10_7'
    model = Pix2PixModel(opt)
    model.netG.train()
⑥ FaceSwapに使う画像や動画を読みこみます。
こちらを編集することで画像、動画どちらを使うかの切り替えや、顔交換に使う画像・動画ファイルを指定することができます。
・target_type:画像を使う場合は”image”, 動画を使う場合”video”に設定する。
・source_path:顔交換の参照画像(はめる顔)の画像パスを指定する。(自分で準備した画像を使う場合は、先にcolab上にアップロードする)
・target_path:顔交換の対象画像(顔をはめる画像)の画像パスを指定する。(自分で準備した画像は同上)
・path_to_video:動画にはめたい場合はこちらでパス指定。
#@markdown #**Upload source image and video**

#@markdown choose not really long videos, coz it can take a lot of time otherwise

#@markdown choose source image as a photo -- preferable a selfie of a person

target_type = 'image' #@param ["video", "image"]


source_path = 'examples/images/elon_musk.jpg' #@param {type:"string"}
target_path = 'examples/images/beckham.jpg' #@param {type:"string"}
path_to_video = 'examples/videos/nggyup.mp4' #@param {type:"string"}

source_full = cv2.imread(source_path)
OUT_VIDEO_NAME = "examples/results/result.mp4"
crop_size = 224 # don't change this


# check, if we can detect face on the source image

try:
    source = crop_face(source_full, app, crop_size)[0]
    source = [source[:, :, ::-1]]
    print("Everything is ok!")
except TypeError:
    print("Bad source images")

# read video
if target_type == 'image':
    target_full = cv2.imread(target_path)
    full_frames = [target_full]
else:
    full_frames, fps = read_video(path_to_video)
target = get_target(full_frames, app, crop_size)
⑥ FaceSwap画像、動画の生成
#@markdown #**Inference**


batch_size =  40#@param {type:"integer"}

START_TIME = time.time()

final_frames_list, crop_frames_list, full_frames, tfm_array_list = model_inference(full_frames,
                                                                                   source,
                                                                                   target,
                                                                                   netArc,
                                                                                   G,
                                                                                   app,
                                                                                   set_target = False,
                                                                                   crop_size=crop_size,
                                                                                   BS=batch_size)

if use_sr:
    final_frames_list = face_enhancement(final_frames_list, model)

if target_type == 'video':
  get_final_video(final_frames_list,
                  crop_frames_list,
                  full_frames,
                  tfm_array_list,
                  OUT_VIDEO_NAME,
                  fps,
                  handler)

  add_audio_from_another_video(path_to_video, OUT_VIDEO_NAME, "audio")

  print(f'Full pipeline took {time.time() - START_TIME}')
  print(f"Video saved with path {OUT_VIDEO_NAME}")
else:
  result = get_final_image(final_frames_list, crop_frames_list, full_frames[0], tfm_array_list, handler)
  cv2.imwrite('examples/results/result.png', result)
⑦FaceSwap結果の確認
#@markdown #**Visualize Image to Image swap**

import matplotlib.pyplot as plt

show_images([source[0][:, :, ::-1], target_full, result], ['Source Image', 'Target Image', 'Swapped Image'], figsize=(20, 15))
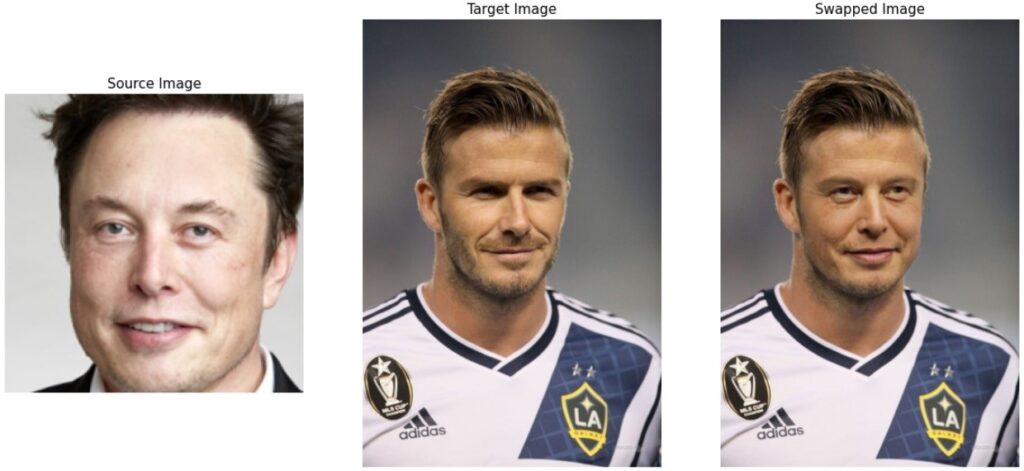
サンプルでは上の画像のように、参照画像にイーロン・マスク、ターゲット画像にベッカムの画像を使った結果が得られます。かなり自然な形で顔が交換されていますね!
動画にも対応しているので、ぜひいろいろと試して遊んでみてください!(SberSwapは素晴らしい技術ですが、間違った使い方をして名誉毀損で逮捕された人もいるので、悪用は厳禁です!)